Your face really takes a beating. Of course, it's not just you...it's all of us and it's inevitable. Our faces are what we wear in the world every single day. I think most of us have something of a routine for cleaning our faces, but my guess is that many people are missing out on an important step: detox!
We are constantly bombarded with toxins in the air…through pollution we can’t avoid, the things we eat and drink, materials we come into contact with…the list really goes on and on. Doing a weekly face detox is an easy addition to your current skincare routine (or easy to add to a new routine for new healthy habits). These little DIY detox face bars are just what you need!

First, what is the best method for maintaining a clean and healthy face?
And does it really make a difference?
I find that they key to keeping your face in tip top shape is a consistent routine. Not only a consistent routine, but a consistent and clean routine. Steer clear of products on the shelves with ingredients you cannot pronounce. The shorter the list, the better! Don't let the multi-billion dollar "beauty" industry fool you into thinking you need all of that junk on your skin that they are selling (reminder: your skin in your body's largest organ)! Let's let nature do her work naturally.
Jess's best steps for maintaining a clean and healthy face:
-
Step 1 - Wash!
Whether you make your own DIY face wash or let your favorite handcrafter whip one up for you (perhaps Pronounce Face Wash!), make sure that it contains clean, nourishing ingredients. You don't want to strip your face dry of all of her natural oils. You simply want to remove the daily dirt and grime. -
Step 2 - Tone!
I find that people often skip this step, or the toner they use is too drying, but I firmly believe that most people should use a quality toner in their regiment, especially those with oily or acne prone skin. A low alcohol toner will help shrink pores and close them up, all while helping restore your skin's proper pH balance. Plus, a nice toner is so refreshing! -
Step 3 - Moisturize!
All skin needs moisture, even acne prone skin. Again, clean and nourishing moisture is what you want. This night cream contains ingredients shown to provide anti-aging properties. Also, check out Pronounce Face Moisturizer (and for acne-prone and oily skin, try Neem Face Moisturizer). -
Step 4 - Serum!
This final step can be customized to what your face needs. Pronounce Face Serum is a super moisturizer targeted to decreasing laugh lines / life lines (aka wrinkles) around the forehead, eyes, and mouth. It should be used at night. This face serum is meant to help lighten acne scars and hyperpigmentation.
Why include a DIY detox face bar?
As you've seen above, I firmly believe that being consistent with a clean routine is important. Isn't that enough?
On the daily, yes...I believe that the four steps detailed above are sufficient to maintain a clean and healthy mug. I also think that sometimes we should go a little deeper to really pull out gunk and grime. A once a week face detox is easy to incorporate into your routine and the benefits can be seen and felt immediately!

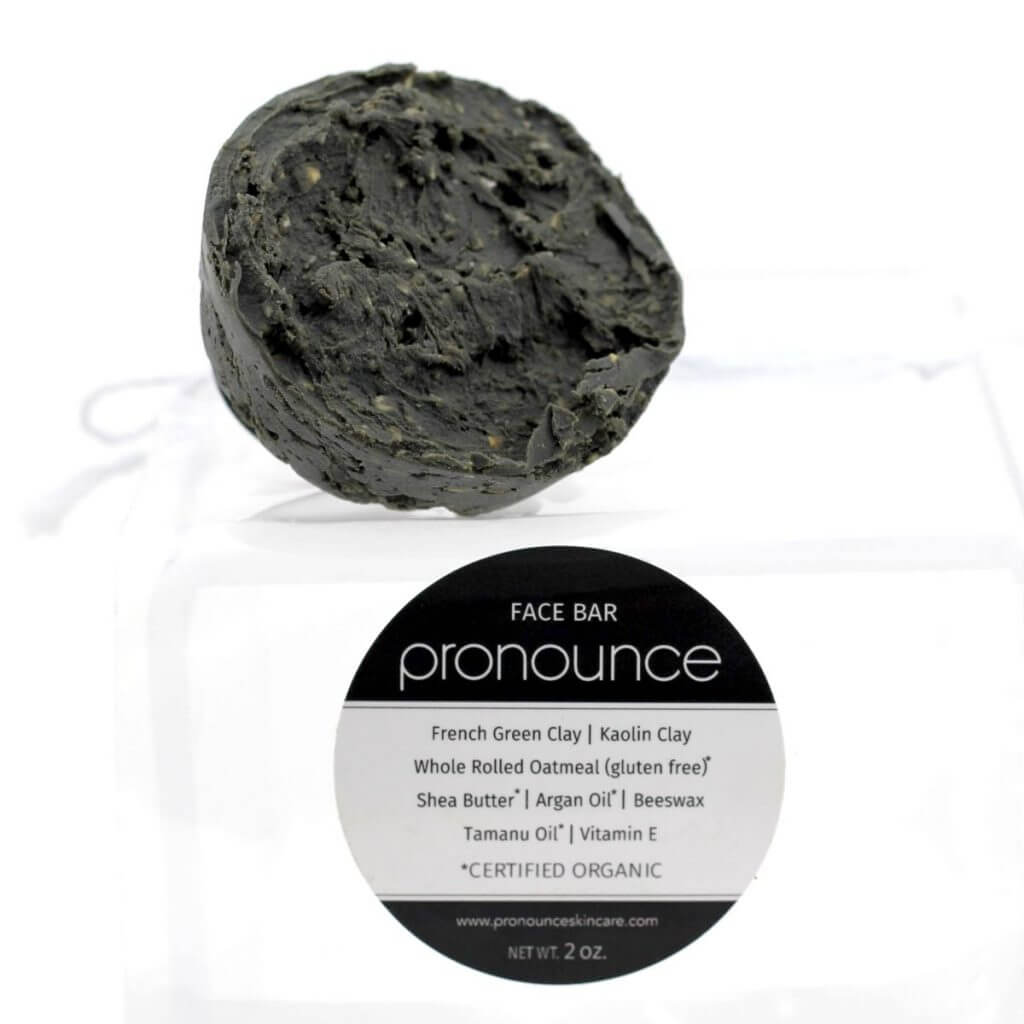
What makes this DIY detox face bar so...well, detoxifying?
Clays + Carrier Oils! Let's dissect...
Clays:
- French Green Clay - THE powerhouse of the clay world. It contains highly valuable elements including iron, aluminum, silica, titanium, magnesium, potassium, calcium, and sodium. With enormous absorption powers, this clay literally drinks up impurities and toxins on your skin.
- Kaolin Clay - Kaolin clay (or white cosmetic clay) is the mildest of all clays and is suitable even for those with sensitive skin concerns. It actually helps to stimulate circulation within the skin, all while gently exfoliating and cleansing skin. It can even be used on dry skin types.
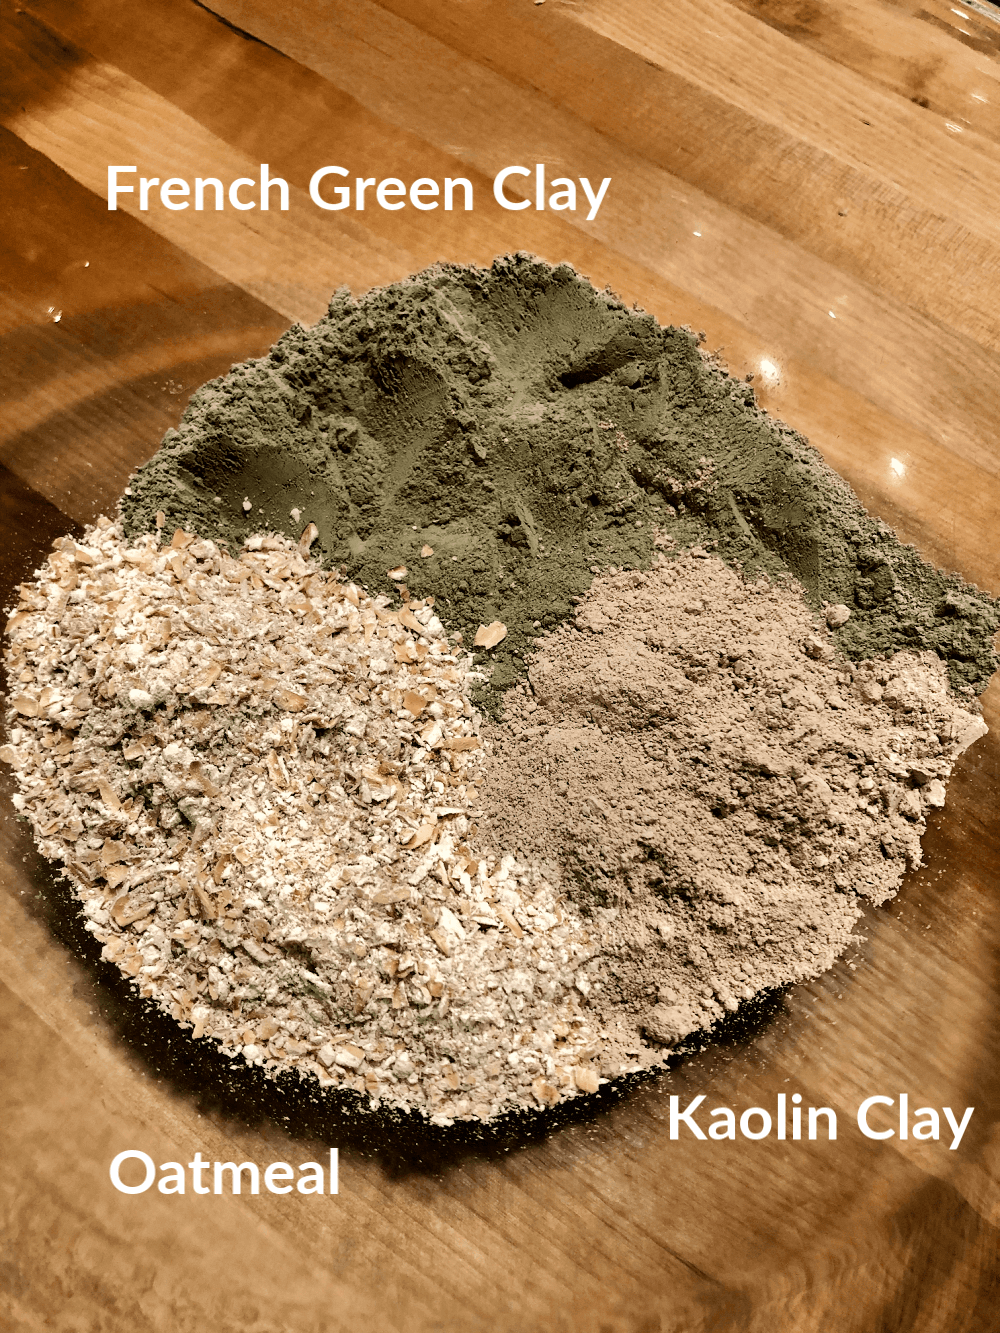
- Whole Rolled Oatmeal - While not a clay, you do want to take your whole rolled oatmeal and grind it into a fairly fine (yet slightly chunky) powder. A few small bits are okay, but get it as fine as you can. Why oatmeal? Oatmeal is a wonderful cleanser, moisturizer, and buffer… and is also quite soothing and an amazingly protective anti-inflammatory agent.
Carrier Oils & Butter:
- Argan Oil - This isn’t called a miracle oil or liquid gold for no reason. In fact, there are many reasons why you need to add this lovely carrier oil into your habitual face regimen! Argan oil is packed full of essential fatty acids, antioxidants, vitamins (lots of Vitamin A and Vitamin E), and important minerals that promote moisturizing and softening of your skin.
- Tamanu Oil - The high content of essential fatty acids make tamanu oil very restorative. Known as a healing oil, it is suitable for all skin types; especially for acne prone and damaged skin. It has been shown to have anti-inflammatory, antioxidant, antimicrobial, and antibiotic properties.
- Shea Butter - One of the most popular and well known body butters, shea butter is high in vitamins A, E, and F, provides collagen (to assist prevention of skin aging & wrinkles), and contains essential fatty acids.
When should you use your DIY detox face bar?
Use your new Face Bar once a week and see if you need it more. During different seasons you might need more or less, but once a week is a great start.
Ready to make your own DIY Detox Face Bar?
After just one use of your new face bar you'll be amazed at how fresh, healthy, bright, detoxed, soft, and *new* your face will feel!
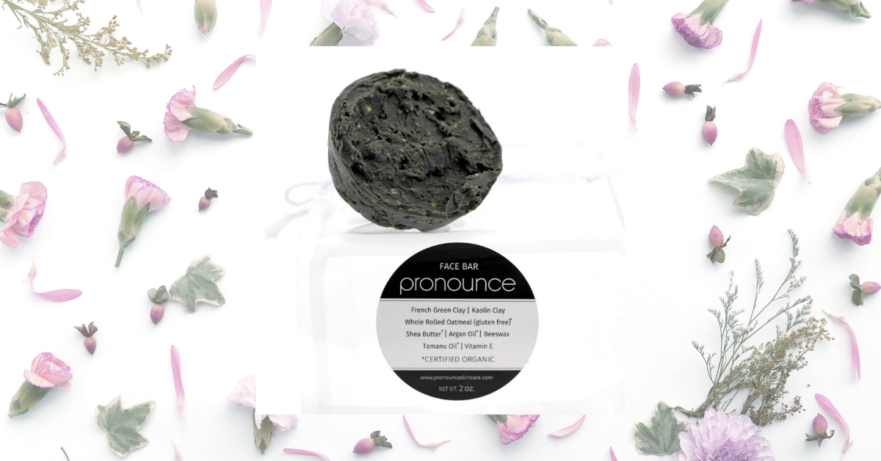
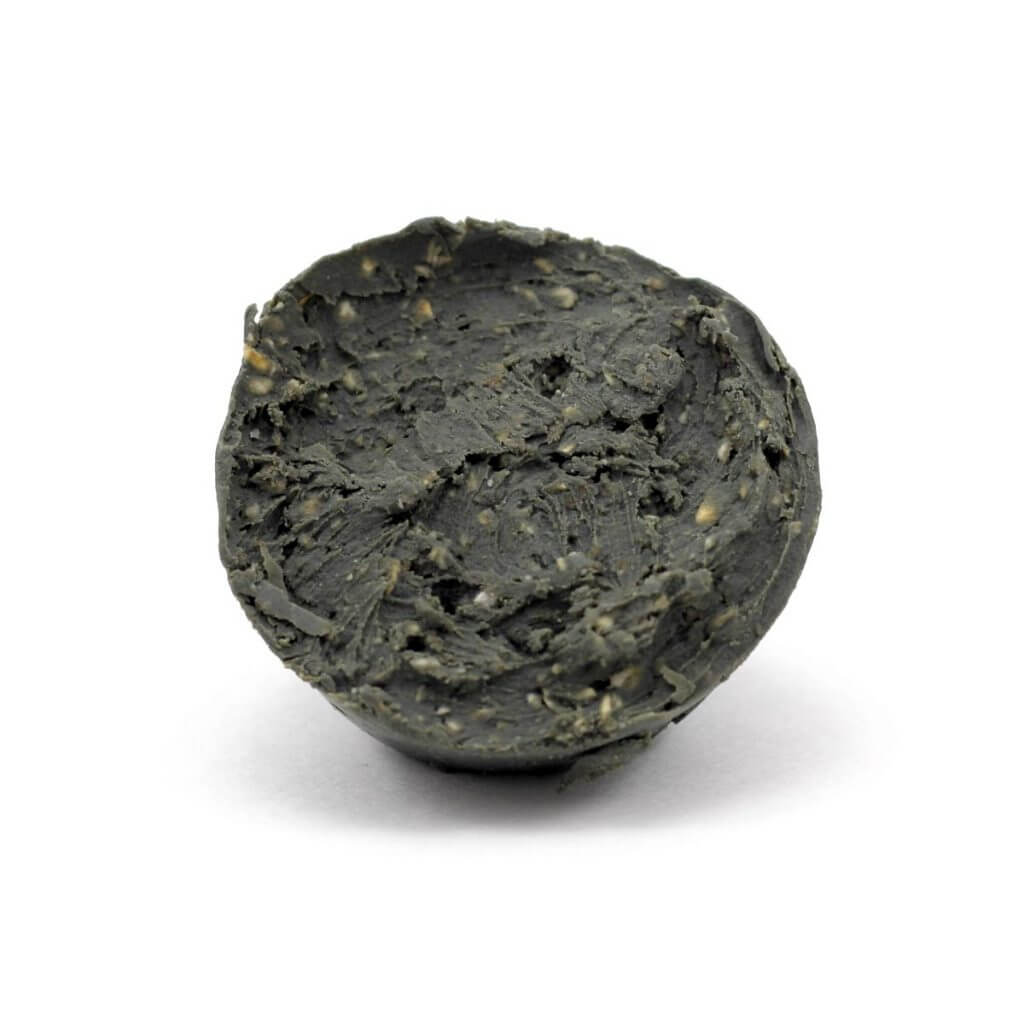
DIY Detox Face Bars
Supplies/Ingredients
- Double-boiler - I make my own with a glass bowl over a simmering pot of shallow H2O.
- Face Bar Mold - This is the mold we use in the Pronounce Laboratory to create our Face Bars.
- 1.5 oz Shea Butter - Raw, organic, unrefined shea butter
- .8 oz Beeswax - I like using beeswax pastilles, as I find them easier to work with
- .8 oz Argan Oil - Organic, cold-pressed, unrefined, & undeodorized argan oil
- .8 oz Tamanu Oil -
- .5 oz Vitamin E Oil - Unrefined, vacuum distilled, non-GMO
- 3.8 oz French Green Clay - Sustainably mixed in France
- 1.5 oz Kaolin Clay - Water washed, unrefined, mined sustainably in the US
- 1.5 oz Oatmeal - Whole rolled gluten-free oatmeal, finely ground
Make DIY Detox Face Bars
- Use a scale to measure shea butter and beeswax in a glass bowl. Melt together shea butter and beeswax in your double-boiler over low heat.
- Remove from heat. Measure and add argan oil, tamanu oil, and vitamin e. Use a whisk to combine. You'll likely need to place your bowl back on the double-boiler to fully combine.
- While you wait, measure your clays and oatmeal in a separate bowl. Once fully liquid, pour the liquid into the powders.
- Using a spatula, mix together and thoroughly combine all ingredients.
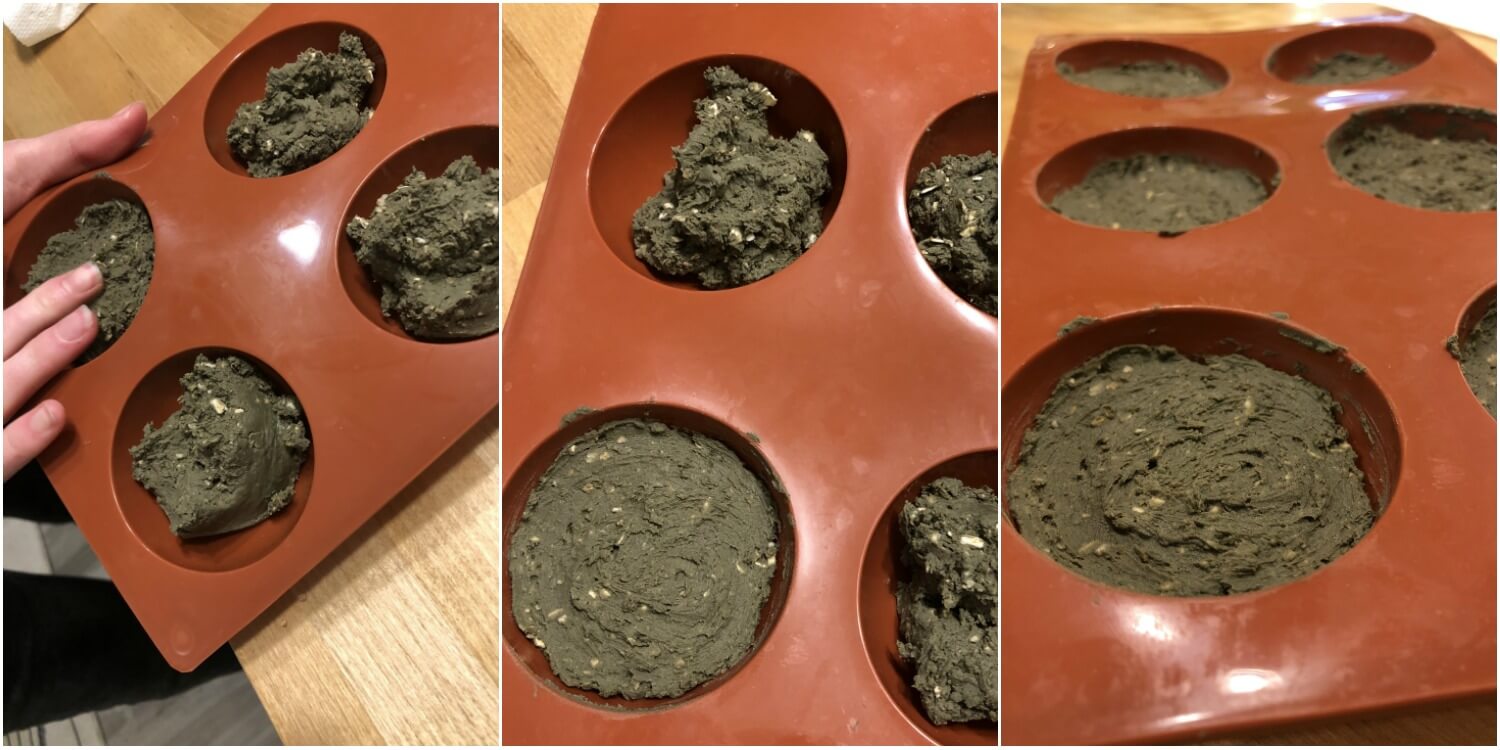
NOTE: See two short videos at the end of this recipe to help you see when to press into molds! - Scoop into molds. Make sure they are pressed all of the way into the mold so they will be round on top. Then flatten the bottom evenly.
- Stick in fridge to chill (for about one hour). Pop out when done. Wahlah!
NOTE: With this recipe you end up with five 2oz face bars. Feel free to gift your extras to friends, family, co-workers, and neighbors...or pop them into bags and place in the fridge or freezer where they will last a very long time (a year or more).
How To Use Your DIY Detox Face Bar
First, wash your face (we recommend this face wash).
Next, grab your face bar and using light circular motions gently massage the face bar all over your damp face. Careful around your eyes!
You will see a layer of the bar on your face creating a mask, this is good! If you don’t see this, you might need a bit more water to soften the bar a bit.
Let a thin layer of face bar sit on your face for 10 minutes (or until totally dry). The face bar will go on dark green and turn to light green when it's done.
Gently splash warm water on your face to remove the detoxifying face bar and then pat dry with a towel.
Follow with your face toner, face moisturizer, and if you are headed to bed...don't forget your face serum.
Hooray for a happy, soft, healthy, detoxed face!
xo,

Not feeling particularly DIYish?
Simply not enough hours in the day? Pinning more than you could ever tackle these days? No worries. I have got you covered. Please, head on over to my Pronounce Skincare Shop where I sell this Face Bar.
While you are there, please look around at all of my other skincare creations. I love making them for my family and for you!
PS Here are two videos to help you...
- This is what it looks like when you initially add liquid into the powders
- Here is what your mix looks like when you are almost ready for molds
Comments 17
I’m hooked! I have become a total convert to the simple bar of soap.
Interesting to use serum after moisturizing. Most skincare companies say use before moisturizing. Has there been a change in skincare industry or ddoes it have to do with all natural ingredient layering?
Author
Hi Teresa! Great question…with the formulations of my facial care line, it works best to put the serum on at the very end so it remains where it should be (only in “laugh lines” and “life lines, if you will…aka wrinkles) and doesn’t spread over the rest of your face, which is what would happen if you put it on before the moisturizer. I hope this helps. 🙂
I love the ingredients in this! It sounds so easy to make, and effective!!
Author
Thank you! Yes, they are easy and fun to make, and so rewarding. Let us know if you whip up a batch!
I love this idea! I have gotten out of the habit of doing a detox mask, so this detox bar is perfect!
I have made sugar scrubs that left my skin smooth and bright but I have never crossed over this detox bar. It is definitely on my “to do” list.
Author
I think you’ll love it!
This looks so interesting! I know that natural, not so pink and overly perfected items tend to be the best though. I really need to make this!!
Author
Thank you! Yes, keeping it natural is best, and easy once you know how. Come back and let us know if you give this face bar a try!
Do you have any recommendations for a sub for oats? I’m allergic to them. 🙁
Author
Ahhhh, yes…you’ll definitely want to leave out oatmeal if you are allergic! You could try adding .5oz of finely ground sugar as a replacement. I haven’t tried it, but I think it will work well. I’d love to know if you try this out. Please come back and let me know. Happy DIYing for you! 🙂
Thank you!
I’ve never seen a recipe like this before. I’m so interested in trying it out at home. I always look for something super calming on my skin, and this looks like it could detox without irritating. Thanks for sharing!
Author
Yes, exactly why I created this recipe the way I did…detox, yet calming. Let us know if you give it a try!
I love the ingredients that you’ve used in this recipe. It seems like it will be very soothing to skin while aiding detox. I’m definitely pinning it to try later!
Author
Yes, soothing, but hard hitting in the detox area! I hope you’ll give it a go. 🙂